API Access
The API Access tab in Tickera Settings generates and manages the API keys used by the Checkinera mobile and web check-in apps. You can issue per-event keys (limit check-in staff to a single event) or an all-events master key for trusted gate managers. This is the standalone-mode API config; for the Bridge for WooCommerce variant, see API Access (WooCommerce mode).
The API Access tab is where you manage the keys that power Tickera’s check-in process. These keys are what connect your website’s attendee database with the Checkinera app (including the Checkinera web app). Without them, syncing attendees and recording check-ins from external devices wouldn’t be possible.
Every time you create a new event, Tickera automatically generates an API key for it. You can also create additional keys manually—for example, if you want separate keys for multiple entrances, different staff members, or even specific devices. This allows for fine-grained tracking and added security at large or multi-day events.
Creating a new API key
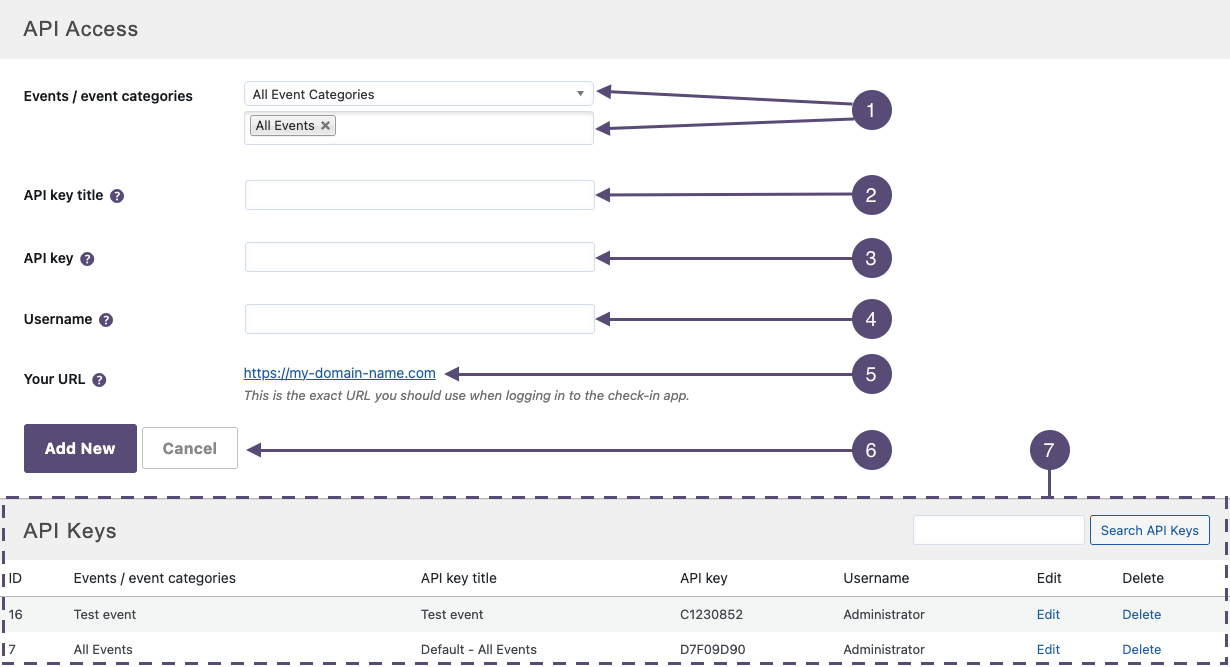
To manually create a new API key, open Tickera -> Settings -> API Access and fill in the available fields:
1. Events / event categpories
Choose one or more events that this API key should apply to.
- Selecting All creates a universal key that works for every event on your site.
- You can also assign a key to an entire event category to cover all events grouped under it.
2. API key title
Give your API key a descriptive name – something like iPhone 1, South Entrance, or John Smith. This helps you identify where or by whom the key is used later on. This field is optional but highly recommended for better tracking.
3. API key
This is the actual key you’ll use to connect to the Checkinera app. You can use any combination of letters and numbers – just make sure it’s unique and something you can easily reference later.
4. Username
Here you can assign the API key to a specific WordPress user. This is particularly useful when giving limited check-in access to staff members. If you leave it blank, the key will be available only to administrators.
5. API/WordPress URL
This field displays the URL that the Checkinera app will use to communicate with your site’s attendee database. You’ll need to enter this exact URL when setting up the Checkinera app on your device.
6. Add New / Cancel
When everything is set, click the Add New button to create your API key or Cancel to cancel the operation.
7. Managing API keys
Once created, your API keys will appear in the table below, along with any that were automatically generated when you added new events.The table lists:
- ID – internal identifier for the API key.
- Event – the event associated with the key (or “All” for global access).
- API key name – a label to help you recognize each key.
- API key – the unique code used for connecting Checkinera.
- Username – the WordPress user who has access to this key.
From this table, you can edit, delete, or review existing API keys at any time.
Using API keys with Checkinera
Once you’ve created or confirmed your API keys, they can be used to connect the Checkinera app to your site.
You’ll need two things to complete the setup:
- The API/WordPress URL (from your API Access tab).
- The API Key (either event-specific or global).
Enter both into Checkinera’s login screen.
If you’re using the Checkinera plugin, simply paste them into the corresponding fields.
For full step-by-step app instructions, refer to:
Exporting check-in records (optional but powerful)
If you want to analyze check-in performance afterward—entrance bottlenecks, load per device, first vs. last entry time, etc.—you can export check-in data using the CSV Export add-on.
CSV exports include:
- Device / API key used
- Timestamp of every check-in
- Check-in success / fail status
- Associated attendee details
This means you can compare entrances, devices, or staff efficiency, or build reports for clients after the event.
For advanced ideas, see: How to Utilize CSV Export Add-on Like a Pro
Pro tips
- Use descriptive names: Create a separate key per device or entrance to easily identify check-in sources later.
- Restrict access: Assign keys to specific WordPress users if you want to limit who can perform check-ins.
- Rotate keys periodically: For high-security events or recurring setups, regenerate your keys every few months.
- Global keys for testing: If you’re testing Checkinera across multiple events, a universal “All” key can save time.
- Combine with CSV Export: Export check-ins later to see which entrance/device checked in the most people.
Related questions
Was this article helpful?
Yes — great. No or partially? Tell us what was missing — we read every message and use it to improve these docs.