Reassociate existing tickets with correct events
A database-level fix for reassociating existing tickets with the correct events — needed when events have been recreated or duplicated and the underlying ticket records were left pointing at the old event ID. Common scenario: you cloned an event for next year, accidentally moved attendees to the wrong copy, need to fix the link without manually reissuing tickets.
Ticket sales move fast, and sometimes a ticket type ends up connected to the wrong event. Other times, you might decide to merge events into one, or split a large event into several smaller ones. When that happens after tickets have already been issued, you need a safe way to correct the structure without canceling tickets or asking customers to buy again.
This add-on gives you that control.
After you install and activate it, go to Reassociate tickets area of Tickera Settings.
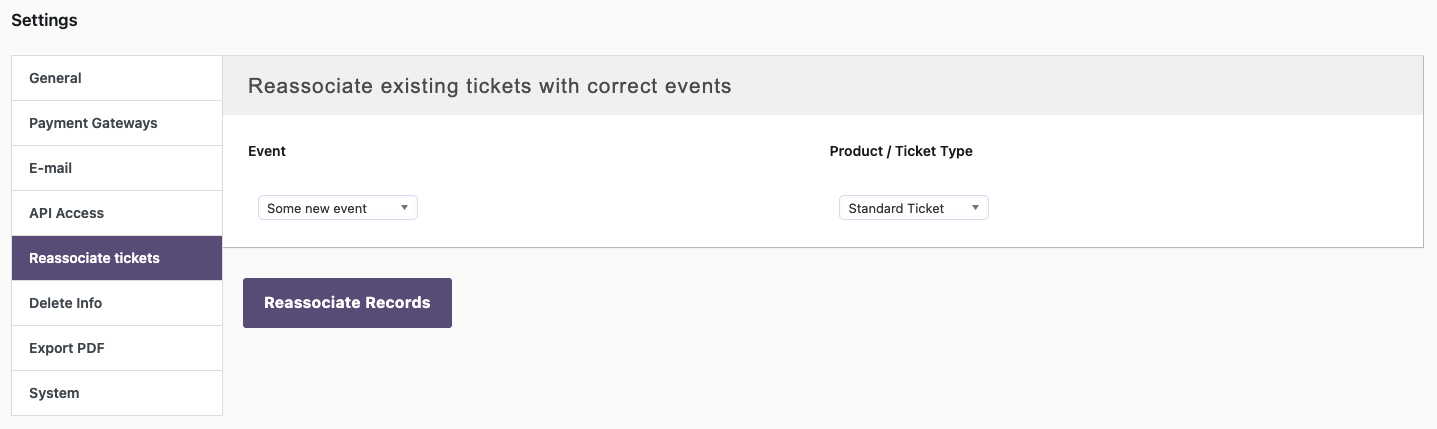
Usage
In this section, you will find two simple dropdowns:
- Event – select the event to which the tickets should be reassociated
- Product / Ticket Type – select the ticket type you want to move
After making your selections, click the Reassociate Records button. All existing ticket instances belonging to that ticket type will be reassigned to the selected event.
This lets you:
- Move tickets to the correct event after a setup mistake.
- Merge tickets from multiple events into a single, correct event.
- Split tickets from one event and move specific ticket types to a new event.
This directly affects the check-in process. As soon as the reassignment finishes, those tickets start using the API key of the newly selected event. Staff can now scan and check in those tickets under the correct event inside the Checkinera app.
Important note about future ticket sales
This add-on only changes existing ticket instances.
If you leave the ticket type (or WooCommerce product, when using Bridge for WooCommerce) unchanged, any new tickets sold in the future will still be created for the original, incorrect event.
To fix both past and future tickets, do the following:
After you finish reassociating the existing tickets, edit the ticket type inside Tickera (or the product inside WooCommerce if you use Bridge for WooCommerce) and assign it to the same event you selected during the reassociation.
That way, all new tickets will point to the correct event as well.
How to monitor the change in real time
Once the reassociation process is complete, the results will immediately be visible in Tickera -> Attendees & Tickets.
For a smooth workflow, do the following:
- Open Attendees & Tickets in one browser tab and filter it by the event you are moving tickets to.
- In another tab, go to Tickera Settings -> Event IDs and perform the reassociation.
- Return to the Attendees & Tickets tab and refresh the page – the moved tickets should now appear under the selected event.
This allows you to confirm in real time that the operation was successful.
Need to change something else?
If you need to change any other detail of your event, we recommend you read our post When your event needs a makeover – editing events without breaking everything which explains in detail what’s safe to change and in what way.
Related
Was this article helpful?
Yes — great. No or partially? Tell us what was missing — we read every message and use it to improve these docs.