Using Tickera in gyms and fitness centres
As it says on the tin, Tickera is the event ticketing system. It's equipped with all the bells and whistles pointed towards efficient event ticketing so it shines when it comes to all sorts of such scenarios. However, with a little bit of creativity involved, it can be used for many other ticketing purposes. For example, you can use it as a gym or fitness centre membership management. Sounds like something you would need for your or your client's gym? Read on!
The idea
The idea behind this is quite simple: as owner of the gym or fitness centre, you want to sell the memberships to people using your website which they can then either print themselves or save it to their phone and show it each time they come to your gym/fitness centre. Basically, customers will be purchasing their gym membership on your website using Tickera and receiving the ticket with barcode and/or QR code which they will be using each time they come to your gym/fitness centre to check-in.
There are two ways of achieving this: with Tickera as a standalone in which case a customer will need to purchase a new membership and get a new ticket each time their membership expires or by running Tickera alongside WooCommerce with Bridge for WooCommerce and WooCommerce Subscriptions plugin in which case a customer can have ongoing subscription with automatic membership renewal so they can check-in with the same ticket for as long as their subscription is active.
Setting up with Tickera as a standalone
As always, when it comes to Tickera, everything starts with creating the event. So, we'll do that first. Create an event that you will be using to associate your ticket types with. This brings us to the creation of ticket types which will be basically gym/fitness centre subscriptions. So, we will need one ticket type for each of the variants: one month, three months, six months and yearly subscription. In order to limit the check-ins to match the subscription duration, you should select Within the following time after first check-in as displayed in the screenshot below:
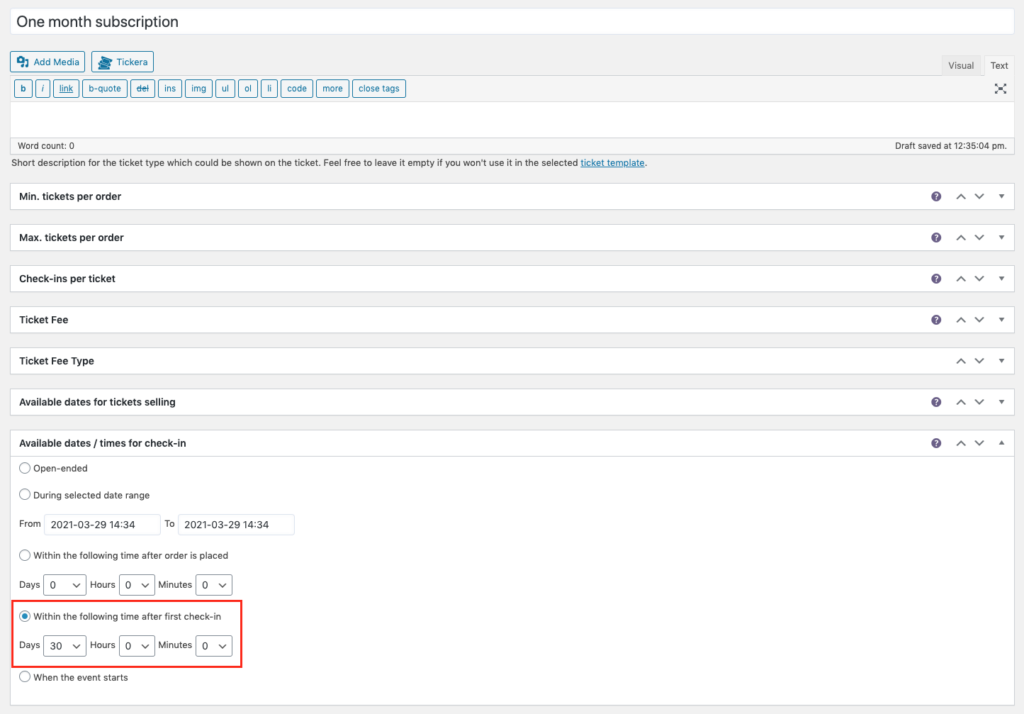
When the customer purchases the ticket with the check-in availability set up like this, validity of their ticket starts counting after their first check-in and will be, of course, valid 30 days after the first check-in. So, based on this, you can create the rest of the ticket types for other subscriptions: three months subscription will be valid for 90 days, six months will be valid for 180 days and yearly subscription will be valid for 365 days. Also, if for example, you are offering access to the gym and fitness which have different pricing, you can create separate events for gym and fitness and then use these event pages to display the available memberships. When done, your event page may look something like this:

*Please note that look and feel of the event page varies drastically depending on the theme that you're using on your website.
Setting up with ticket types as WooCommerce Subscription products
For this, you will need Tickera, WooCommerce, Bridge for WooCommerce and WooCommerce Subscriptions installed on your website.
As with the previous solution, we will also start by creating an event in Tickera. Once you create the event, you can proceed with creating your tickets but this time we will be doing this within WooCommerce.
So, head to Products area of WooCommerce and create new product. When the page loads, you should make sure that you're creating a product as a simple subscription product by selecting Simple subscription from the Product data dropdown menu (1). After that, you can enter the price of the subscription and how often it should be renewed automatically as well as define other parameters of the subscription according to your needs (2). Last, but certainly not least, you should make sure that you have checked Product is a Ticket checkbox (3) to declare this product as a ticket and to be able to assign this product to the event that you have previously created.
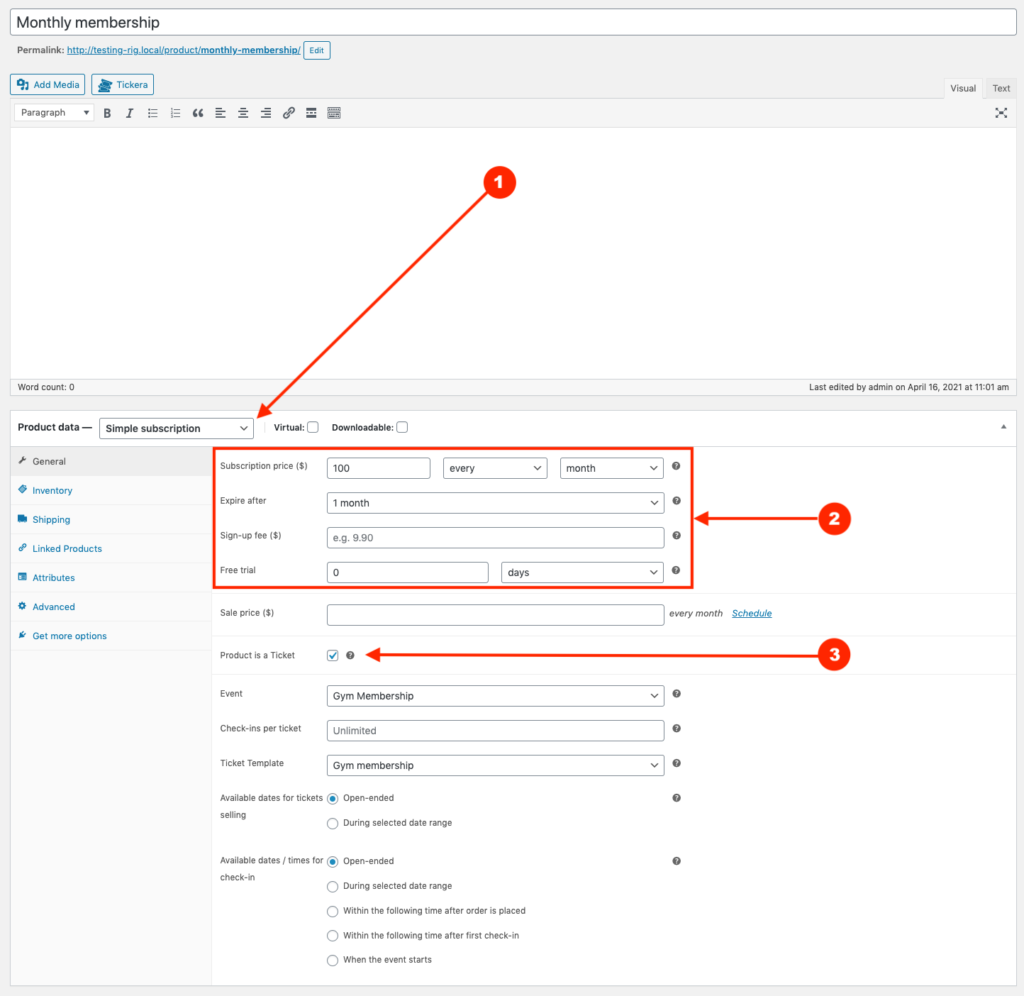
Now, when it comes to available dates/times for check-in, you can leave this as open ended. This is because when ticket type is created as subscription product, check-in availability is matched with subscription duration. So, in a nutshell, for as long as customer's subscription is active, they will be able to check their ticket in. Pretty neat, right?
One thing to keep in mind is that, when the initial order is renewed, a new order will be created in WooCommerce (this is simply how it works) and when you edit this order, you will notice that there are no tickets present in this order. This might cause a confusion but rest assured that this is how it supposed to be. All the renewal orders that are created automatically are child orders of the initial (parent) order which contains a ticket associated to it.
Checking-in
When the customer purchases their membership on your website, they will receive an email within which they will be able to download their ticket that will contain QR and/or barcode that will grant them entrance to the gym. Now, if you have took the approach of using Tickera as a standalone and use ticket check-in availability as a check-in limitation factor, their membership will start counting once their ticket has been checked-in first time and will remain valid one, three, six or twelve months after the first check-in. Of course, you can set it up differently and use, for example, fixed start and end date and time or even leave check-ins open ended but with limited number of check-ins. It all depends on your needs really.

However, if you are running Tickera with WooCommerce and selling tickets as WooCommerce subscription products, then a customer's membership will start from the moment they have made their order and will remain active for as long as they are renewing their subscription and will be cancelled as soon as the subscription expires and is not renewed.
Regardless of the approach you're taking the process for checking in is the same: when the customer arrives to your gym, they will display their membership card (which is actually a ticket) and the person at the front desk should then use a device with Checkinera app installed to check them in. If the app returns that the check-in was successful, you can let the member in.
Which way should I use?
We certainly recommend the approach with Tickera alongside WooCommerce via Bridge for WooCommerce and WooCommerce Subscriptions plugin as this supports automatic recurring payments and does not require customers to purchase a new membership card each their membership expires. However, WooCommerce Subscriptions plugin is not free so if you are on a tight budget or this model suits your needs, in some scenarios, this might be plausible approach and sometimes even due to the sheer simplicity of set up.
Again, selling membership tickets as WooCommerce subscription products is far superior and much more elegant as it is basically "set and forget" for both you and your customers. It does cost a pretty penny but we believe it is quite good and justified investment if you will be relying your business on that.
Conclusion
As you can see, with a little bit of creative thinking and tweaking, you can completely repurpose Tickera and make use of it for scenarios such as this or any other similar ones. Basically, whenever you have a need to control access and admit only ticketed customers to enter some premises, it is very likely that you can make use of Tickera for that.
Check out our other use cases to get the idea what's possible with Tickera.
Have some interesting use case you found yourself and would like to share it with fellow Tickerians? Shoot us an email to info@tickera.com