Create neatly looking ticket template
Ticket layout and design is often taken for granted and somehow always comes at the end of setting up event ticketing on your website. This is somewhat understandable as tickets themselves are mostly boring pieces of paper that have one sole purpose: to let you enter the event. But let's briefly take a look at this from a perspective of someone who waited for a long time for your event to happen and what that means to them.
Ticket as a piece of art
Surely, your event itself will be a memorable experience that lots of attendees will cherish for a long time. They may even buy some merch at your event to have a memento for the rest of their lives. But the ticket itself is most often a memorabilia that is kept for the longest and even one brief look at it may bring memories of "good old time" years after the event. So, why not make the ticket for your event more than just a boring paper of PDF file that only says the title of the event, the date and barcode? Give your tickets that personal touch and show your attendees that you care about them and, above all, your event. After all, even if all of this is still not a good reason for you to go extra mile and create a nice looking ticket, the final reason might be that you can charge more for nice looking tickets. And, people will buy it. Trust us. Among others, the very author of this post is more than willing to pay extra for nicely designed ticket of his favourite band and then frame it and hang it at the wall.
The technical side of it
Okay, so we somehow managed to persuade you to do this. But how? Where do you even begin? Let's see first what you already have and start from there.
If you care about organizing a successful and memorable event, you most likely already have strong visual identity of your event. This includes a logo, choice of recognizable colours and anything else that makes your event visually recognizable. Also, you most likely have a designer that takes care of all this. Excellent, congrats, you have all the key ingredients. Now, just start by asking your designer to make a background image that will undoubtedly speak the visual language of your event. This image is what we will be building our beautiful ticket around. Tell your designer to go crazy (they love this... believe me) and if they have several ideas, ask them to give you all they got. We'll explain later why.
Tickera's ticket template builder
Judging by Tickera's default ticket template and on the outside of it's ticket template builder, it doesn't seem like much and, admittedly, it has its fair share of quirks and limitations which you can't get past easily. But it is actually quite a powerful tool if you know how to utilize it and work around its limitations.
First of all, you have to decide the format and orientation that you want to use for your tickets. By default, Tickera offers a few most commonly used formats such as Letter, A4, A5, etc. However, if you want anything other than this, you can utilize our plugin found here that will allow you to set custom ticket template format and have your ticket sized to anything you see fit.
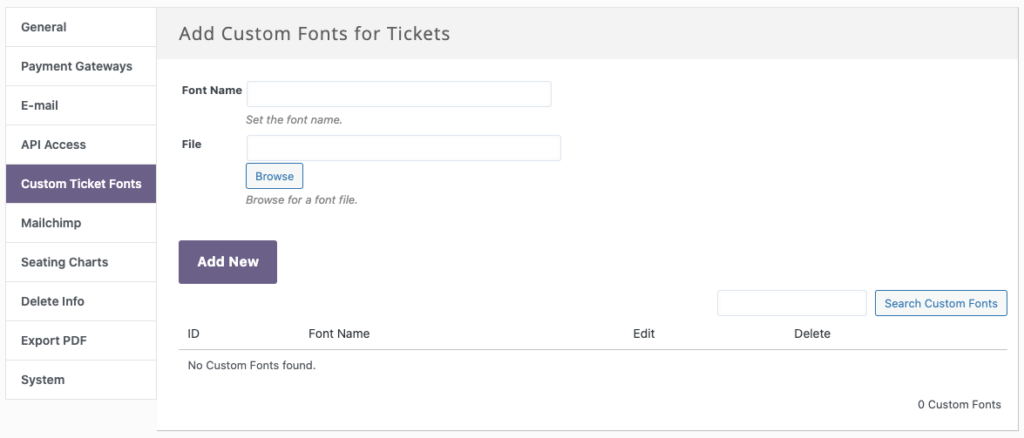
The next thing you should do is to select the font that you will be using on your tickets. Chances are, if you already have strong visual identity, you have also a font that goes with it and that you're using basically everywhere (if not, you really should). So, to use the same font on your tickets, you can utilize our Custom Ticket Template Fonts add-on that will allow you to upload and use on your tickets any font in .ttf format.
Less is more
Now that these two things are sorted, you should decide which information you would like to put on your tickets. As an unwritten rule, the less information you cram to the ticket, the better it will look and less confused the customer will be. So, if you can, you should follow this and place to the ticket only information that are most relevant and that are "dynamic" (meaning: different for each attendee). It will get clearer afterward why that is. So, you should place to the ticket only information such as attendee name, ticket code, QR code and barcode. With ticket template builder in Tickera, it is basically a matter of dragging and dropping these elements to the template and adjusting font size and colour. If you want to know more how ticket template builder is used, you can find all about it in our documentation here.
Test order
Once you're done placing information where you want it on the ticket, save your template and assign it to some ticket type that you will be using this template with. After that, make a test order of that ticket type so that so that ticket instance gets created. The easiest way to do this is to create a 100% discount code for yourself, add the ticket to the cart, apply a discount code, and finish the checkout. When done, navigate to the Attendees & Tickets area of Tickera, and you should be able to find your ticket there. Click Download to download it, and that's it for this part.
But it still doesn't look cool?!
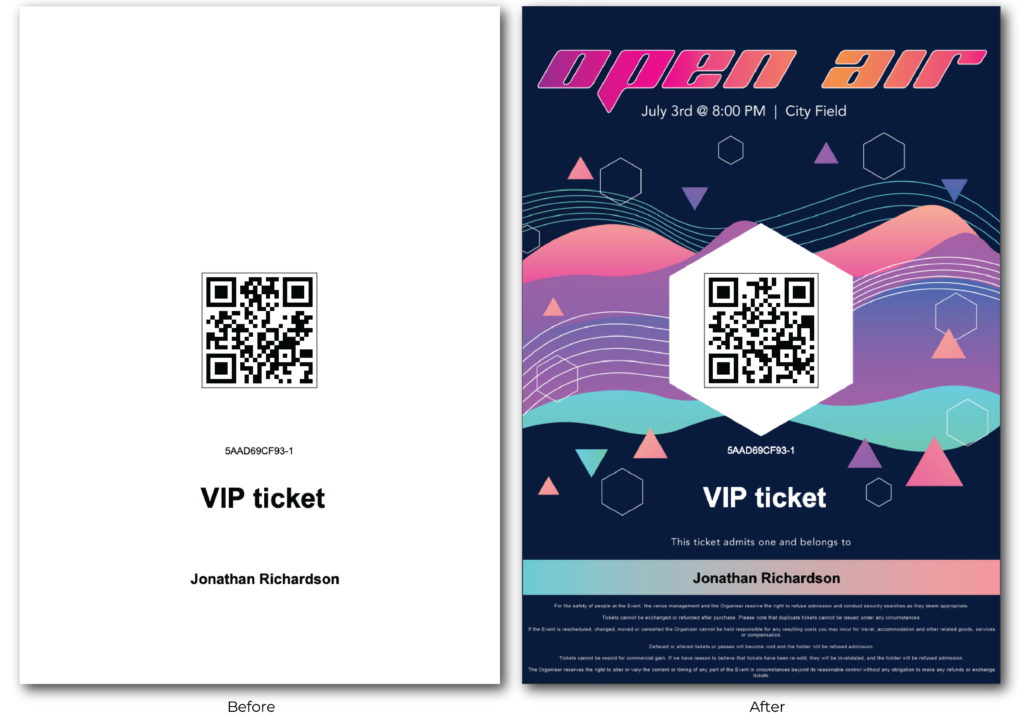
Yeah... we know. But this is where a little bit of trickery goes a veeeeery long way. The ticket that you have downloaded (the one you made a test order for) will serve us as a guide for our final design of the ticket. To continue designing a ticket, you should import this ticket to one of your preferred graphic editing applications (eg. Adobe Illustrator, Adobe Photoshop or any other that supports PDF files and creating multiple layers). Make sure that the file you have created in this application has the same size as the ticket that you have created in Tickera (eg. Letter, A4, A5 and such). Now, create a new layer and build the rest of design around the information that is already on the ticket. Remember that background image that you said your designer to go crazy with? Use it! Also, you can add to this design any "static" information that you want and where you want. For example, you can add your event title, date of the event and similar information that is same for every attendee. Of course, you can add this using elements in Tickera's ticket template builder but doing it this way, allows you much more flexibility in design and positioning (talking about working around limitations of ticket template builder).
NOW it looks cool, right?
What do I do with it?
Once you're done designing your ticket, you should remove the layer that contains ticket that you have imported (the one from test order that doesn't look cool) and leave only design that you have done in other layers. Export this as .png file and make sure that the file size is not obnoxiously large. You really don't need anything more than 150 dpi resolution.
Now head again to Tickera's ticket template editor and edit a ticket template. Add this image as a background to your previously created ticket template... et volià!
What happened now is that you are using your design as a background of the ticket but since you have created this design around the elements that were already placed on the ticket, everything fits perfectly like it belongs together. Pretty awesome, right?
Couple of things to keep in mind
It's all fun and games when imagination goes crazy when designing a ticket. But let's get serious for a bit and point a few things that might get you in trouble.
As you may already know, the most vital part of your ticket is certainly barcode and QR code (or both... yes, you can and should use both on your tickets). The inability to scan these at the door would be... well... nothing short of disastrous. So, keep that in mind while designing your background image and make sure that you always have barcode and QR code in black on white background and in the place of the ticket where it's least likely it will be folded. Let's just say that QR an especially barcodes are rather primitive and mixing them with busy background may easily render them unscannable.
One more thing...
Remember when we said that you can monetize all these shenanigans with ticket design? Yes, you can. To do this, you can create two separate ticket types, one of which will be a plain, white ticket with relevant information and will be cheaper, and the other one, with design, that will cost a bit more. May I also suggest to name this ticket Limited Series and limit available quantity of this ticket type to fraction of the number of "standard" ticket type ? It's okay, you can thank me later.
Also, if you have multiple designs, you can create a different ticket template, with a different design for each ticket type. This will not only look nice for attendees but will also help person at the door to easily recognize which ticket type attendee holds even before reading what it says on the ticket.