– Tables
A reference page for the Seating Charts editor, covering one of the building blocks you use to construct your venue layout. Combined with the other building blocks (seating groups, standing areas, tables, decorative elements, text, background images), this is what lets you draw any venue as a fully interactive, click-to-buy seating chart.
Some events aren’t about rows of seats or standing crowds — sometimes they’re about dinner, discussion, or a bit of both. Whether it’s a wedding, conference, or gala, the tables in Seating Charts lets you create and arrange tables with individual seats around them.
Each table can be linked to a specific ticket type, so every seat around that table corresponds to an actual purchasable ticket.
Adding a table
To add a new table, click the table icon in the toolbox.
This opens the Tables pane on the right-hand side of the editor.
From there, you can define how your table looks and behaves.
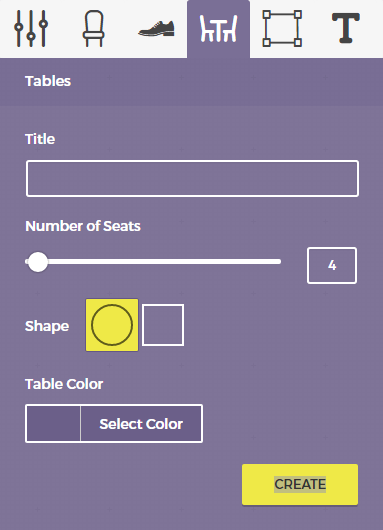
Table shape
You can choose between two shapes: round and rectangular.
Round tables are simple — you only need to enter the number of seats, and Tickera will automatically distribute them evenly around the table.
Rectangular tables include an extra setting called End Seats, which appears as soon as you select the rectangle shape.
This lets you directly influence the table’s geometry. For example:
If you create a table with 16 seats and set 4 end seats, you’ll get a perfect square — four sides with four seats each.
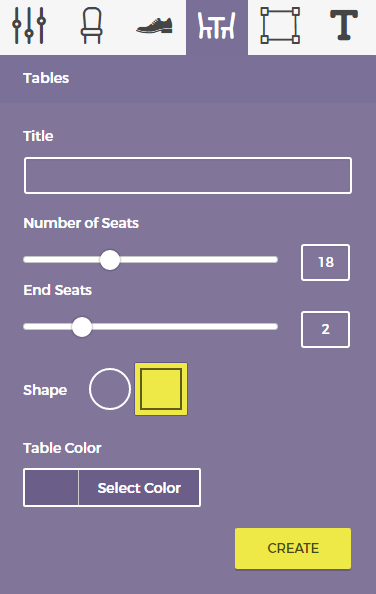
The available number of end seats will always adjust dynamically based on the total number of seats you’ve entered, ensuring that the math adds up evenly and that all seats are properly distributed around the shape.
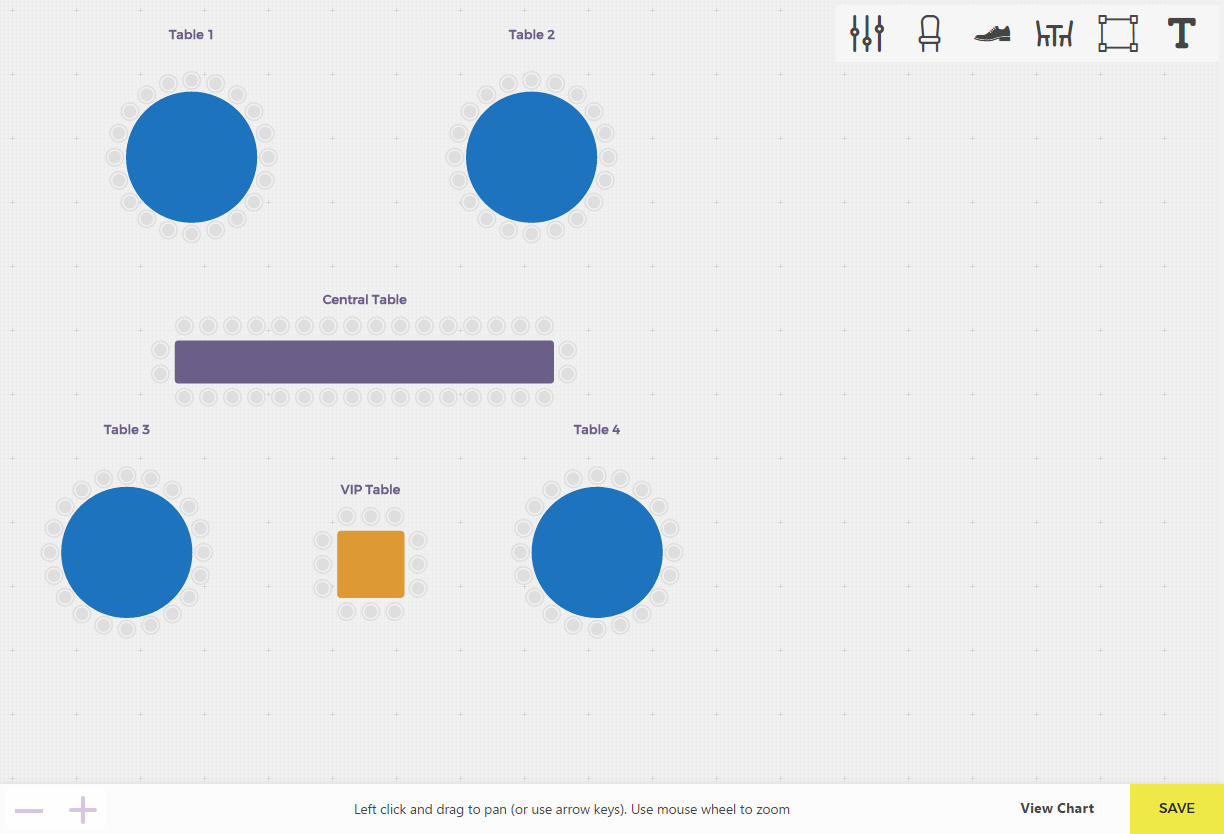
Creating the table
Click Create. Your seating chart table appears on the canvas with all its seats placed. At this point, the seats aren’t linked to any ticket type yet — they’ll take on colors only after you assign ticket types to the seats.
Assigning ticket types to table seats
Seat assignment works exactly like seating groups:
Select the seats you want to assign. You can:
- Lasso-select: click and hold, draw a loop around seats, release to select.
- Select non-neighboring seats:
- On Mac, hold Command (⌘) while clicking additional seats.
- On Windows, hold Ctrl while clicking additional seats.
You can also combine methods (for example, lasso the first side of a table, hold Command/Ctrl, then lasso the opposite side). This even works across multiple tables if needed.
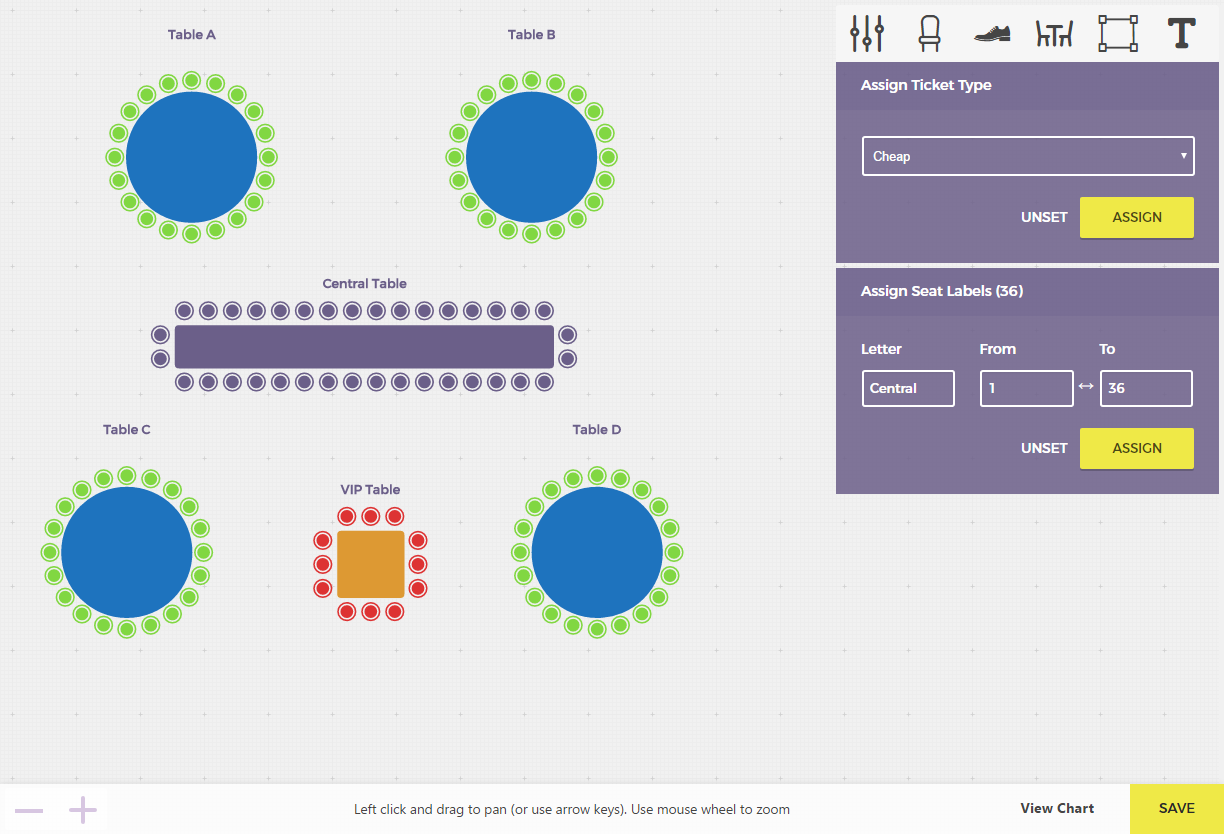
When seats are selected, use the ticket type dropdown in the top-right of the editor and click Assign. The selected seats will adopt the color of that ticket type. If you make a mistake, reselect and click Unset, or assign a different ticket type.
You don’t have to assign every seat at a table — any unassigned seat simply won’t appear on the front end.
Labeling table seats
Just like with seating groups, you can add seat labels after assignment. Select seats, set a prefix (for example, T1, T2, etc.), confirm the From/To numbering the editor suggests, and click Assign. Labels print on the attendee’s ticket next to the ticket type name so they know exactly where to sit.
Important: Don’t skip labeling. Without labels, you won’t be able to save the seating chart.
Editing, moving and rotating
Drag to move the table on the canvas. Hover to reveal the control icons along the bottom:
- Pencil: reopen the table pane to change settings like seat count or rename.
- Trash: delete the table and its seats.
- Bring to front (small rectangle): layer the table above overlapping elements.
- Rotate: click-and-drag to rotate.
![]()
Pro tip
If you’re mixing tables with seating groups and standing areas, keep your ticket type colors consistent across similar zones. It makes the chart easier to read for both you and your customers.
Next step
Your tables are in and seats are assignable and label-ready. Next, add elements — non-seating visuals like stages, bars, exits, and restrooms that help buyers instantly understand your layout as well as text elements to label certain areas of the venue.
Related
Was this article helpful?
Yes — great. No or partially? Tell us what was missing — we read every message and use it to improve these docs.